About

A blog about SCAMP (Small Craft Advisor Magazine Project) boats. Covering the build, sailing the boat and the scamp community that has formed around this little portly boat.

Tuesday, September 27, 2016

One of the last days of the season

And the weather is great. 10-12 knots and steady. 75 degrees and sunny. Yeeehaw!!!

Wednesday, September 14, 2016

Pintles & gudgeons for sale

This is a set of Davey & Co 1589/GM/MCN pintles & gudgeons that I bought from the chandlery in Port Townsend.  I never used them. The internal measurement is 2 1/8". They use #8 hardware but it is not included.
I paid $230 plus tax, which is still a good discount off list price.  I will sell for $220.  Please contact me if you are interested.  See the Craigslist post if you don't have my personal contact info or for pictures.

Sunday, September 11, 2016

Holes through the skegs might not be a great idea

Some time ago, I drilled and filled holes through my skegs for toggle bolts so that I didn't need a strap to go all the way around the boat. I was very happy with the situation.

Until I noticed that there were some cracks in the skegs that weren't there before.

<I have pictures, I'll modify this post with pictures when I can.>


Today I did some investigation, sanding and patching. I now believe that it was not the stress from the bouncing on the trailer. I think it was because I din't get the holes sealed as well as I thought. I used red oak for the skegs and I think some water got in and seeped throught the wood pores and caused it to stretch a bit.

I sanded everything down and recoated with epoxy and graphite powder.

I also found another area where the skeg had rubbed against the trailer and scraped it down to the wood. That must have been recent, as I had found that before on the other skeg and patched it already.

Too bad it's such a pain to work on the skegs under the trailer.

I will continue to experiment with this and let everyone know.

Port Townsend sailing

In mid August, I made it up to Port Townsend to see my friend Howard. Please read Howard's blog about his upcoming journey to Tierra Del Fuego.
I didn't get much sailing time in, but I got to chat with a lot of people.

Then yesterday, I made it back to Port Townsend for the Wooden Boat Festival. Again, I got to see a lot of friends and chat about small boats. A good time.

Tuesday, July 12, 2016

Red Lantern Rally 2016


July 9-10 was the 3rd annual Red Lantern Rally in beautiful Mystery Bay, WA.

We had 9 Scamps show up with an 10th showing up later in the day. I hope I have all the names correct.

  1. Pumpkin Scamp (name unknown): Christian, Lizzie & Matilda
  2. New boat (name unknown): David & Vicki
  3. PT Puffin: me
  4. Scamp #1: Josh
  5. Gig Harbor boat with green stripe: Falk
  6. Gig Harbor white boat: Bob
  7. Serenity: Sergei
  8. Skol: Terry
  9. Noddy: Simeon
  10. Tor: Mike

One thing I love about the Scamps is that we always see a new boat. Last year, we had Dan's boat launch for the first time. This year, we had Dave launch his beautiful new boat. It's great to see the new boats get launched.

LtoR: Pumpkin Scamp, new boat, PT Puffin, Scamp, Gig Harbor boat, Bob's GH boat 

LtoR: same as above but now with Serenity (Sergei).

The same order with Skol out at anchor and Noddy on the dock
Most boats had arrived by 10:00AM per Simeon's recommendation to get there before the tide got too low.
The wind in the morning was gusty to probably about 20mph. We all reefed in as far as possible and went out for a thrilling sail. I do feel bad for the new launchers. I'm still nervous in a 20mph wind.
Sergei was gracious enough to take out Dave and Vicki and show them the ropes. Simeon helped Christian rig his sail and Falk was kind enough to help Christian and Lizzie when they were under oars and having trouble with the winds.

I rushed to get the Puffin the water and violated most of my own rules for safe sailing. Firstly, I had forgotten to rig up my tiller clutch line. So when I noticed I had a reef line wrapped around my boom, I had to fix the tiller clutch before I could unwrap the line. It was then I realized that I hadn't even put on my PFD, something I always insist on before I ever leave the dock.
I was also unhappy with the fiddle block on my downhaul. I was a bit worried about it being too skewed and indeed the block was a bit twisted and not working like I wanted it. I decided that I did indeed need the double block that I had originally wanted.
I had to fix all the above problems on the water under a gusty 20mph wind. I need to work on my discipline and mental checklist. Make sure everything is correct before I actually set out.

The afternoon was very calm. I didn't get out on the water as I was too busy chatting with other builders.
After a nice dinner with Bruce, Josh and Sergei, I stayed the evening in the PT Puffin tied to the dock.

Sunday morning we were becalmed so we all packed up and left before the tide got too low. I got to stop by Skip and Melissa's wonderful Port Ludlow estate and see their scamp-in-progress.

I think everyone had a good time; I certainly did. Thanks to Josh for organizing.

TODO list:

  1. build some oarlock reinforcers (blogpost in progress)
  2. build some oars
  3. get a new tent built
  4. Put my battery in a waterproof pelican case
  5. consider fixed ballast as I'm light right now
  6. sail even more this summer

Sunday, July 3, 2016

Soft shackle follow up

I found some grey 1/8" Dyneema single braid. This is much more suitable for soft shackles than the 1/4".

I made a fid from a metal rod that I had laying around and worked up a few soft shackles.
Top to bottom: better 8", better 5", better 5", normal 5"
 In the above picture you can just see the vise marks where I clamped down and pulled the knot tight. I did it twice, once from the tails and once from the top. Similar to the instruction page.
The same after using a hot knife to trim
I installed the soft shackles on the cabin top. I've gotten some wear there from the 90 degree stainless shackles that I had. These seem to lay better and won't scratch my finish.
Cabin top
When I recently re-rigged my traveler, I had two shackles to join the two blocks. I replaced that with a soft shackle.
Traveler

I am keeping all the original stainless shackles in my repair kit in the boat. I know Dyneema has amazing strength properties, but having a backup is a good thing.

Unfortunately, today is not a great sailing day. Tomorrow may be better.

I'm looking forward to the Red Lantern Rally 2016 at Mystery Bay July 9-10.

Update: Also see my post on soft padeyes. I put 4 of them under each side of the cabin top and more of them in each well under the hatches. The toy hammocks that hang there work well for storing objects up off the bottom of the hull.

Friday, July 1, 2016

Soft shackles

Soft Shackles

While investigating l-36.com (mentioned in my last post), I found a page of ideas for soft shackles. I had seen some soft shackles at WestMarine, but they were $25 a pop and seemed ridiculously expensive. After reading that page and a page at Grog's Knots, I decided I could tie my own soft shackles, learn something and have fun.

I found 50' of 1/4" dyneema single braid cord.  I followed Grog's directions and built a soft shackle.

Closed up

Open
When we were in Port Townsend for August 2014 Scamp Camp, Howard went over the PT Bronze Foundry and picked up some bronze bow eyes. I really like the look of the bow eye, but it doesn't fitthe trailer hook. I had an oval link on there since I launched her. It hadn't really scratched the paint, but I wanted to replace it.
Now it's a soft bow eye
Unfortunately, the 1/4" dyneema is huge when it gets doubled up. I'm going to find some 1/8" dyneema and use that for the two shackles on the cabin top. I also have a 90 degree shackle on the traveler and on the centerboard padeye. Those might get soft shackles too.
And they won't be orange.

Rudder repairs 

I mentioned a few posts ago that I had lost the nylon lock nut on the 3/8" bolt that is the pivot that joins the rudder to the rudder head. I replaced the bolt with a clevis pin.

Tuesday, June 28, 2016

Finishing the downhaul

I posted on the SCAMP message board asking for pictures of downhauls. I didn't get any pictures, but I did get a link to Michael Storer's page about rigging a lug rig that was very helpful. I wish I'd read that before I started rigging my own boat. I would maybe have understood things a bit better.

I also found a link explaining how mechanical advantage worked. I hadn't thought about it in a long time and that page was helpful to explain the system that I intended to use.

Since I asked for pictures on the thread,  I need to post my own pictures.
After the paint cured, I could attach the fairlead and the cleat

The simulated downhaul

Using a fiddle  on the cabin and a block with a becket on the boom.
Currently, there is only a single Harken block with no becket on the GigHarbor boom. I'll need to either replace that or just tie the line to the padeye.


Coming up next: Softshackles.

Sunday, June 26, 2016

More maintenance work

Last weekend, I posted about my attempts at maintenance. Over the week, I've finished up quite a few of the projects.

Centerboard rigging

The simple 6mm standoffs I built are now done and attached. This seems to keep the rope & tackle away from the sides. It still bumps occasionally, but not nearly as bad as before.
In the pictures below, you can just see the standoffs.
See the standoffs under the cleat and under the padeye?

Another shot of the fully attached fairlead.


Skeg trailer hitches

I got this idea from Simeon. In this thread on the SCAMP message board, he talked about tying a rope through his skegs to his trailer. I thought that was a good idea as I've never liked the belly strap method where the straps go up & over and have the possibility of marring or breaking the coamings.

But I didn't like the idea of threading a rope through the skegs each time. I rather liked the idea of toggle bolts instead.

I ordered some 5/16" toggle bolts that were rated to like 900lbs on the pull through. If I were to do this over again, I'd use 3/8" or 1/2" toggle bolts instead. I also ordered some short webbing straps and stainless black 1 1/2" fender washers.

Then I got to work drilling holes in the skegs.
After piloting, I used a 1 1/2" paddle bit to chow a hole in the side of the skeg.
Hole in the skeg

Hole with washer inserted.
I over drilled with a 1/4" drill bit a guide for the toggle bolt. This will be filled to make sure no wood is exposed.
Then I filled the hole with thickened epoxy glue and glued the washer in. It's easiest to sink the washer in just a little bit so it is a mm or so below the surface. You can fair this later with thickened epoxy.
Washers glued in  and tape over them to hold
 When that was done, I drilled the 5/16" hole through the middle for the toggle bolt.
Toggle bolt and eye nut in place

And here it is with the strap in place
 I wasn't too happy with where the washers ended up and since glue doesn't stick very well to stainless steel, I then mixed up another thickened batch of epoxy and faired over the washers. This way they are unlikely to fall out.

Shot after fairing a bit.

toggle bolt though the hole

port side in place

and tied down.

shot of the interior with the toggle in place
I used it just today and it worked fine.

Downhaul rigging

I wanted to re-do my downhaul so that I could get more tension on the luff of the sail. I had been using a single block/v-cleat combo to pull it down, but it was hard to reach and hard to get leverage.

I decided to do something more like the plans. To do that, I wanted to have a fairlead and cleat on the cabin top. When I built the cabin top, I had placed a doubler under the cabin top  where I knew I might want a cam cleat.
I just needed to create a block of wood to raise the cleat up just a little bit. I cut that from some spare chunks of doubled up 6mm plywood and re-coated that with epoxy.

Then I had to sand it down to fit flush on the curved surface. I used a trick I learned from Dan bcbimmer. Just tape a piece of sandpaper on the curved cabin top and rub the piece back and forth.
Shaping the block to fit the surface
After it was shaped, I need to sand down the paint to get it to stick.

Just before gluing down the block

dry fitting the parts where they belong (oops, the cam cleat is upside down)

Pilot holes drilled and glued down. Fillet applied

dry fitting the parts

Finally, it's painted
I'll wait a few days for the paint to harden up before I mount the fairlead and cam cleat down. The fairlead is just screwed into the block, but the three #6 screws in the cam cleat go all the way through the block and have acorn nuts on the bottom.

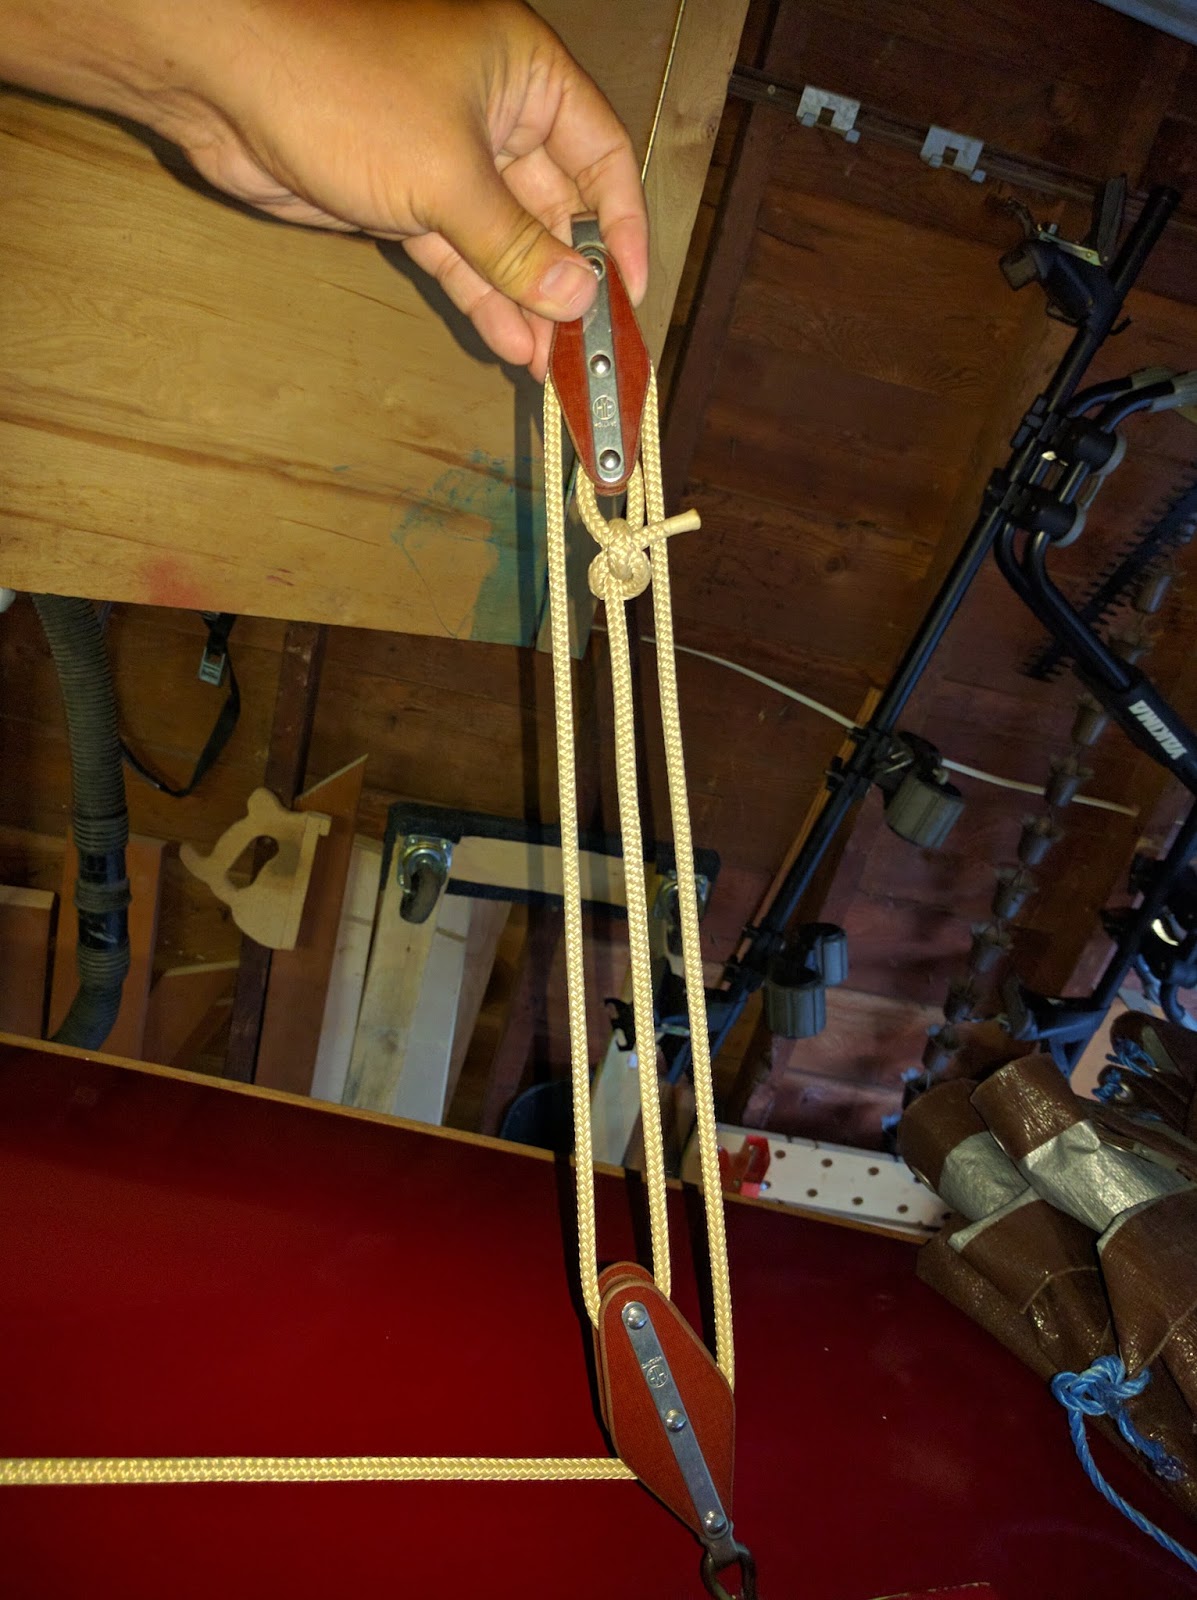
A line on the padeye on the boom will go down and through a double block mounted just next to the mast box. From there, it will go back up to a block mounted on the same padeye on the boom and back down through the double block. Then it goes after through the fairlead and cam cleat. This gives me a 2:1 purchase. Not as good as some others, but I can fix it later with more blocks if needed.

Sunday, June 19, 2016

Rudder repair, centerboard rigging and skeg protector repair

In my last post, I discussed some of the changes I wanted to make. Today I did some work towards that.

Skeg work

The UHMW plastic guard that protect the bottom of the skegs had pulled the screws out on the port side. I think I messed it up once when I put it on the trailer a bit sideways.
I jacked up the boat with a racing jack and was able to get under the trailer to fill the holes with new thickened epoxy and screw them down again. While I was down there, I made a parts list for through-skeg tie downs like Simeon has. I'll post an article when I get those done.
No pictures for this one.

Traveler rigging

I had a rope traveler with a sliding shackle around it. The shackle slides along the rope and has abraded the rope a bit. I replaced the shackle with a real 12mm block. I then used a pair of shackles to make a flexible shackle to the sheet block. Works great.
New traveler rigging

I really like the adjustable traveler. I don't change it very often, but it's kind of nice when I need it.

Re-rigging the centerboard

The centerboard tackle was rubbing against the side of the seat and rubbing off the paint. I use centerboard tackle slightly modified from the plans. I've been told there is a better way to rig it, but /i like mostly like mine, except for the rubbing.
All I need to do is to build some 6mm standoffs to pull the tackle away from the seats. I've got the pieces epoxied, now they just need to be painted and installed.
Centerboard rigging as original

Harken 108 turning block. Note the scratch where it jumped the block

standoffs

standoffs with pieces attached


I also used a fairlead to guide the centerboard uphill. 
fairlead in place


I'll finish this later this week after I paint the blocks.

Re-rigging the boom downhaul

I spoke with Rick at the Small Craft Palooza. He encouraged me to redesign my downhaul to really be able to crank it down. The leading edge should be completely taut when not running in light air or downwind. I was using a combo block/cleat from Duckworks. It's okay, but it's hard to get it too tight and hard to reach when under sail. Today, I cut and epoxied blocks of wood to mount on the cabin top for a 2 factor downhaul that cleats near the cabin top. I'll need a tufnol double block and then I'll mount it all later. I'll post pictures when I get it all done.
Epoxied blocks: padeye, cleat, 2 different blocks for the downhaul rig

Tuesday, June 14, 2016

Palooza Crooza 2016


A hearty thank you to Marty and all my new friends from the Palooza Crooza 2016.

Friday evening

Rainbow over Indian Island
I arrived Friday evening and put PT Puffin (origin of the name) on the hard behind NWMC. Most boats had already arrived although a few more showed up on Saturday morning.

Saturday

Saturday was the Palooza show. A ton of people stopped by to look at the boats. I had a great time discussing boats with everyone. I completely lost track of the time and before I knew it the day had ended.
The weather was very Port Townsend for most of the day. Spatters of rain mixed with wonderful periods of brightness.
There was a captains meeting called by Marty around 6:30 and a potluck before that.
Marty said the weather didn't look great, so the plan changed to sail to Mystery Bay. Which was fine by me because I love that little bay and I was a bit concerned about the original plan to sail past Point Wilson.
I'm always happy to know about the motorsailers that follow us along in case of emergencies. A huge thank you to the guys who do that to make sure the rest of us stay safe. This year it was Kirk, Ron and Marty. I didn't get any pictures, but they are my heroes.

Sunday

Sunday morning we left for Mystery Bay. We went around Rat Island and then had a nice leisurely downwind sail to Mystery Bay. We arrived around 11:30, which was pretty fast. We spent the day just playing in Mystery bay. The day was cloudy for most of it and in the low 60s.
Sergei and Quin in Serenity

Sergei

Simeon and Stephen in Noddy and Charles and Bruce in Silver Belle

Aft shot of Silver Belle

Thanks

I'd really like to thank everyone. I had a great time. Especially meeting new folks with similar interests.

There were lots of pictures taken.
I'll update this post when there are some links to other people's pictures.

My boat wishlist

Monday when I got home I found that the 3/8" bolt pin that ties together the rudder to the rudder head had lost it's nylon lock nut. Luckily, the bolt didn't come out or I wouldn't have had a rudder. I will replace it with a clevis pin. I also need to re-glue in the bronze bushings into the rudder. I also need to find some large nylon fender washers to shim the rudder into the head because there is some loose play there.

I do have some improvements to make to the boat:
  1. I still haven't decided what to do about the bailers in the bottom of the footwell. I'm too nervous to cut into the bottom of the boat without a good plan.
  2. I need to re-make my tent. Preferably out of waterproof fabric.
  3. I need to make a new tent pole and reinforce the oarlocks. The tent pole goes into each oarlock. There were some good designs for oarlock mounts at the Palooza.
  4. I need oars and oar storage
  5. I need a way to tie down the sleeping boards that cover the footwell, I occasionally hear them clunk in the cabin as the boat shifts.
  6. I need stainless eyes on the aft of the boat for tying it to the trailer.
Bruce was helping me to make a rainproof cover over the tent when we came up with a good idea to lash the boom to the mast to draw it aft. We then put the sheet through the forward downhaul block. This makes a great tent ridgeline. I used a tarp as a tent. Luckily I didn't get rained on at all.

Steampunk


Curiously enough, the Port Townsend annual steampunk festival was in town on Saturday and Sunday. The Steampunk folk were out in force. These guys are great. They like to make stuff and I like that.
Steampunk is the idea that the late 1800s were a period of great intellect where they were limited by their steam engines. At one point I walked past a hall and heard a Victorian scientist giving a lecture on the scientific properties of aether. Great fun.
Steampunk Hover car
Steampunk bicycle car